আসসালামু আলাইকুম

মঙ্গলবার, ২৭ মার্চ, ২০১২

Using command prompt "attrib" to check for Viruses or Malware

Microsoft Command Prompt "attrib" is a very useful tool to check if your hard drives even your flashdisks have been infected by a virus.

You will know if a Malware is inside your hard drive just by looking at the attributes of each files and the file that has the attributes of +s +h +r

The function of attrib is to set and remove file attributes (read-only, archive, system and hidden).

Launch attrib
To start attrib

Go to Start Menu > Run
Type cmd (cmd stands for command prompt)
Press Enter key
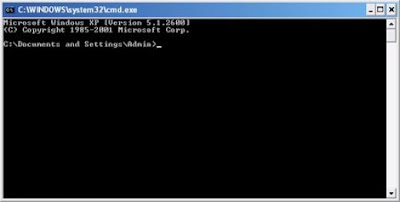
The Command Prompt will appear showing us where is our location in the directory.

Using attrib
To use attrib

Go to the root directory first by typing cd\(because this is always the target of Malware / Virus)
2. Type attrib and press Enter key

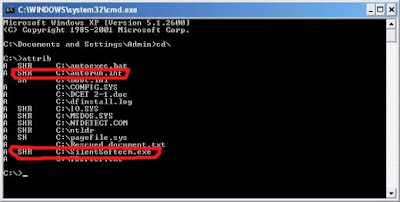
In this example, I have two files that are considered as malware.

Note that there are two files which I outlined in red (SilentSoftech.exe and autorun.inf). Since you cannot see this file nor delete it (because the attributes that was set on these files are +s +h +r)

+s - meaning it is a system file (which also means that you cannot delete it just by using the delete command)
+h - means it is hidden (so you cannot delete it)


+r - means it is a read only file ( which also means that you cannot delete it just by using the delete command)


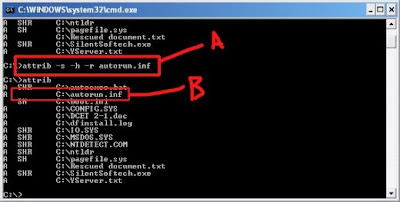
Now we need to set the attributes of autorun.inf to -s -h -r (so that we can manually delete it)

Type attrib -s -h -r autorun.inf ( be sure to include -s -h -r because you cannot change the attributes using only -s or -h or -r alone)
Type attrib again to check if your changes have been commited
If the autorun.inf file has no more attributes, you can now delete it by typing del autorun.inf
Since SilentSoftech.exe is a malware you can remove its attributes by doing step 1 and step 3(just change the filename) ex. attrib -s -h -r silentsoftech.exe

There you have it!!!!

NOTE : when autorun.inf keeps coming back even if you already deleted it, be sure to check your Task Manager by pressing CTRL + ALT + DELETE ( a virus is still running as a process thats why you cannot delete it. KILL the process first by selecting it and clicking End Process.

NOTE: You can also apply the attrib -s -h -r command to all the partition of your computer, drive D: drive E: drive F: (all of your drives). For example. for drive D, just type "D:" (minus the double quote) then you can see that your current drive is D.. type there the command "attrib -s -h -r *.exe" for exe files and "attrib -s -h -r *.inf" and then delete the file by "del autorun.inf".

Hope this helps!!!!! :)

Here's an easy step by step procedure how to hide any partition/drive

1. Go to Start > run > type "diskpart".A DOS window will appear with following discription.DISKPART>

2. Then type "list volume"The result will look like : ------Volume ### Ltr Label Fs Type Size Status Info--------------- --- -------- ---- ------ ---- ------ ----Volume 0 F CD-ROMVolume 1 C Window_XP NTFS Partition 7000MB Healthy SystemVolume 2 D Softwares NTFS Partition 8000MB HealthyVolume 3 E Songs NTFS Partition 8000MB Healthy

3. Suppose u wanna hide drive E then type "select volume 3". Then amessage will appear in same winwods { Volume 3 is the selectedvolume}

4. Now type "remove letter E". Now a message will come { DiskpartRemoved the Drive letter }sometime it requires the reboot the computer. Diskpart will remove theletter. Windows XP is not having capabilty to identify the unkownvolume.Your Data is safe now from all unauthorised users. To access thecontent of hidden Drive repeat the process mentioned above. But in4th step replace " remove" to "assign" i mean type "assign letter E"
Good Luck

আপনার কম্পিউটারে USB Port বন্ধ করে দিন সহজ উপায়ে………

সালাম সবাইকে সবাই কেমন আছেন? আসাকরি ভাল আছেন, আপনাদের জন্য একটি মজার টিপস নিয়ে আসছি দেখে মজা পাবেন….ভাল করে লক্ষ্য করুন………..

অর্থাৎ আপনার কম্পিউটারের Pen drive&Modem ডুকালে Show করবে না মজা না! তাহলে এবার চট করে করে ফেলুন

প্রথমে Desktop এ My Computer এর উপর Mouse এর Right button ক্লিক করে অতঃপর Manage এ ক্লিক করে Continue তে ক্লিক করে Device Manager এ ক্লিক করে Universal Serial Bus controllers থেকে USB Root Hub সবার শেষের আগেরটা করে Right button ক্লিক করে Disable দিবেন দেখবেন আপনার কম্পিউটারে আর Pen drive এবং Modem যাই ডুকান আর Show করবে না, আবার Enable করে দিলে Show করবে

Startup Delayer

Can you learn another language in the time it takes for your machine to boot? Do you turn on your PC when you go to bed, so it’s finished booting by the time you get home from work the next day?
When Windows loads it’s Startup file, it attempts to load every program in there at the same time. Therefore if you have quite a lot of programs starting when Windows starts, each program will try and grab CPU time so that it can load.

If each program tries to do this at the same time, you soon notice the slow down that occurs, due to your CPU trying to help all the programs to load, and your hard disk accessing multiple files.

Startup Delayer allows you to setup how many seconds after Windows has started, to load each program.

• For Example:
If you have your mail program and a special clock starting up, then you can make your mail start say 10 seconds after Windows has loaded, and then the special clock start 20 seconds after Windows Starts.

What’s New in Startup Delayer 3.0 :

· Modified AutoUpdate to keep checking when an update is found and only revert to delayed checking after an update. This helps keep users up to date
· Added error prompt when unable to gain access when writing a file and updated the existing localization
· Fixed serialization bug when setting idle values to 0
· Updated all of the Startup Delayer project to completely remove all Krypton controls
· Updated all of the Startup Launcher project to completely remove all Krypton controls
· Threaded the initialization of the Timers so that Startup Launcher starts up faster
· Updated the Install process to remove more old files
· Fixed Zip codepage for the SDXmlUpgrader
· Updated all Forms to ensure they support 120dpi
· Fixed Install upgrade from 2.x removing Local machine Run entry

DOWNLOAD

Earn money from your blog without adsense

Assalamualaikum.
You can easely earn money from your blog without adsense.
Make money from clicks and conversions
You get paid for every visitor that clicks on an ad, and an extra revenue if the click turns into conversion. Our goal is to enable you to make as much as possible from your advertising space, by letting advertisers bid on your ad space. We pay monthly, either by check, wire or instantly through PayPal with a minimum of only $10.

Earn money by directing users to signup with BidVertiser

Place a Referral button or a text link on your site and you will start to earn money when a user clicks on your button or link and signs as an advertiser or a publisher:

When a user signs as an advertiser and first spends $10, we’ll
credit your account with $5. When that same advertiser
spends $50, you will be credited with an additional $20.

When a user signs as a publisher and first earns $10, we’ll
credit your account with $10. When that same publisher
earns $50, you will be credited with an additional $40.

Your earnings will be tracked in your Referral control panel, including clicks, sign-ups and conversions.
We pay monthly, either by check or instantly through PayPal with a minimum of only $10.

Bidvertiser
So please click below link for registration.

http://www.bidvertiser.com/bdv/bidvertiser/bdv_ref.dbm?Affiliate_ID=25&Ref_Option=pub&Ref_PID=435500

Free DVD CD Data Recovery Softwares To Recover Data

Many time you faced the problems like when putting old CD/DVD disk in drive and it takes a lots of time to load or read by drive lens. You’re trying to copy your important data from CD/DVD and it stopped in middle and your drive can’t able to read it for Scratch or Damaged Disk. And you think “How to recover files from damaged scratch CD/DVD? What is the software for CD or DVD data recovery and where to get them free?

Many time you give your CD or DVD collections for movies or application to your friends and they make too many scratches and when you got them back, you find that they are badly damaged and beyond readable. And the the question of recovery and searching softwares for same comes in mind on that time. To overcome from this condition here some nifty free CD or DVD data recovery software available for free to recover data from your damaged disk and supported any type of media. Here the list:
~CD Recovery Toolbox: This tool was developed for recovering damaged files from different disk types: CD, DVD,HD DVD, Blu-Ray, etc. You can use it to restore information lost as a result of some mechanical damage of the disk (scratches, chips, different spots on thesurface) or as a result of incorrect recording. Thus, the program can recoverdata that was considered lost. The CD Recovery Toolbox Free tool scans any CD and DVD disks and finds files and folders located there. We should mention that there can be some information on the disk that cannot berecovered. Not all of the files and folders can be found – that depends on the degree and location of the damage. The tool is compatible with Windows 98, Windows Me, Windows NT 4.0, Windows 2000, Windows XP, Windows XP SP2, Windows 2003, Windows Vista.
Download Link: CD Recovery ToolboX (647 KB)

Roadkil’s Unstoppable Copier5.2: Recovers files from disks with physical damage. Allows you to copy files from disks with problems such as bad sectors, scratches or that just give errors when reading data. The program will attempt to recover every readable piece of a file and put the pieces together. Using this method most types of files can be made useable even if some parts of the file were not recoverable in the end. Supports Windows 2000, Windows XP, Windows Vista and Windows 7.
Download Link: unstopable copier (129 KB)

~CDCheck: is a utility for the prevention, detection and recovery of damaged files on CD-ROMs with an emphasis on error detection. With CDCheck you can check your CDs and discover which files are corrupted. By using the program proactively, you can insure that your data on CD-ROMs are safe — before it’s too late! CDCheck provides the following features: readability verification, binary compare, CRC file creation (and verification) and file recovery.
Download Link: CDCheck (1.4mb)
~MiniTool Power Data Recovery Free: All in one free data recovery suite supports 32/64 bit Windows Operating System including Windows XP, Vista and Windows 7. This file recovery sotrware to recover their lost data in any condition for free. MiniTool Power Data Recovery Free Edition includes five data recovery modules: Undelete Recovery, Damaged Partition Recovery, Lost Partition Recovery, Digital Media Recovery and CD/DVD Recovery.
Download Link: MiniTool Power Data Recovery Free (5.24 MB)

~IsoPuzzle 1.7 Beta: This program is to recover as much as possible data of damaged, bad burned or scratched CDs or DVDs. The purpose of this program is to recover as much as possible data of damaged, bad burned or scratched CDs or DVDs. This version is experimental and supports only data CDs and DVDs with sectorsize of 2048 byte – Audio CD, VCD and SVCD are not supported. ASPI layer. Please put the WNASPI32.dll together to Your IsoPuzzle.exe folder
Download Link: iso puzzle (93 KB).

How to Write-Protect USB Flash Drive

Many a time, it becomes necessary for us to write protect our USB flash drive so as to protect it from viruses and other malware programs. Because flash drives are so popular and most widely used to move data between computers, they are the prime target for attackers as a means to get infections spread around the computer world. Also, since USB drive is not a Read-Only Memory (ROM), the data inside it can easily be modified or deleted by malware programs.

But unfortunately, most of the new flash drives do not come with a write-protect feature as the manufacturers wish to cut down the cost of production. Hence, the only way to write-protect your USB flash drives is to enable this feature on your own computer.

This can be done by adding a small entry to the Windows registry which acts as a switch that can be enabled to make use of the write protection or disabled to allow write access. Just follow these steps:

1. Open the Registry Editor (Open the “Run” dialog box, type regedit and hit “Enter”).

2. Navigate to the following Registry key:

HKEY_LOCAL_MACHINE\SYSTEM\CurrentControlSet\Control\
3. Create a New Key named as StorageDevicePolicies. To do this right-click on Control, and click on New->Key and name it as StorageDevicePolicies.

4. Now right-click on StorageDevicePolicies and create a New->DWORD (32-bit) Value and name it as WriteProtect.

nd name it as WriteProtect

5. Double-click on WriteProtect and set the Value data to 1.

Now the right-protection for USB drives is enabled on your computer (no restart required) and thus it would not be possible for anyone or any program to add/delete the contents from your USB flash drive. Any attempt to copy or download the files onto the USB drive will result in the following error message being displayed.

To revert and remove the write-protection, all you need to do is just change the Value data for WriteProtect (Step-5) from 1 back to 0. Now write access to all the USB devices is re-enabled.

Sometimes it may seem difficult to remember and follow the above mentioned steps each time you want to enable/disable the write protection. Hence as an alternative way, there are many tools available to automatically enable/disable the write-protection feature. One of my favorite tool is USB Write Protect by Naresh Manadhar. Using this tool you can limit write access to your USB drives with just a click of a button. You can download this tool from the following link:

USBWriteProtect

Hide My MAC Address


Hide your MAC Address from hackers, government agencies, your ISP, WiFi networks, online games, and more! Anyone with the right tools can track your Internet activity if they know your MAC Address. Public Wireless Access Points are all over, some less secure than others. Every time you open your laptop, it automatically attempts to contact to wireless networks, regardless if you use WEP/WPA Encryption. Fool MAC-based ACLs (Access Control Lists) by cloning the MAC address of a computer that is already authorized to use a WiFi network. Don’t let your MAC Address to get out in the open, download Hide My MAC Address now.

Benefits & Features

-Change your MAC Address with only one click!
-Prevent online games from banning you based on your MAC Address.
-Clone the MAC Address of another computer. Bypass some ISP registration requirements.
-Get back into online games that banned you based on your MAC Address.
-Hide your real MAC Address from hackers, WiFi networks, and ISPs.


Size: 1.12 MB

Its password is doh

Download

Trojan Remover 6.8.2 Build 2599

Assalamualiku. Welcome back to Tuner Page. Everybody how are you? I wish you are well. I shall share u a new tools. That name is Trojan Remover 6.8.2 Build 2599.


Trojan Remover 6.8.2 Build 2599
Trojan Remover – program to remove and protect against Trojan horses, even unknown to the standard anti-virus. Checks all system files, including Windows Registry and finds programs that load at startup. For each identified Trojan Horse, or other malware Trojan Remover gives a warning (showing the location and file name), offering to remove the link from the system file and rename the file itself. There is a good library of “Trojans” which is constantly updated via the Internet. The program has a friendly interface and very easy to use.
Trojan Remover aids in the removal of Malware – Trojan Horses, Worms, Adware, Spyware – when standard anti-virus software either fails to detect them or fails to effectively eliminate them. Standard antivirus programs are good at detecting this Malware, but not always good at effectively removing it. The majority of Anti-Malware Scanners are well able to detect malicious software – Trojan Horses, Internet Worms, Adware / Spyware etc. – But are not always efficient in removing them once they have been triggered.

Download

Password: moviesnhacks

Ok, no more today. See you next time, Allah Hafiz………..

Facebook Anti Virous !!! Click here >>>>>

Facebook spam ! Id ses ! Risky application !
ai sob prblem solve korta aybr ami post korbo “FACEBOOK ANTI VIROUS” !!!

Facebook joto popular hocca, totoi jano barca spam,scam,fake app. Ja amdar procur koti kora. Spam ar jalay sobai kom besi birokto.
A doronar Spam/virous ar juki komata use kora jay trusted app “Norton safe web”

Ati facebook profile k always protect rakta help korba. Ati Bibinno group and share kora link gulu scan kora dakba. Spam/virous jukto kono link pala ati nija thaka block kora diva. And sudu safe link gulu apnar home page a show korba.

Step 1: fb ta login korun.

Step 2: arpor jan >>> http:apps.facebook.com/nortonsafeweb/

Step 3: “Request for permission ” ar gora “Allow” click korun.
Akhana ” Please grant us permission to access your News Feed and Wall” a click kora “Allow”, sobsesa “continue” dita hova.

Step 4: arpor “pop-up” window thaka “Enable Auto-scan” a click kora “Allow” dilai ati run korba.

Aybr apni niscinto mona fb use korun. Ar pora kicu bujta problem hola ask korban. R post ti valo lagla Like korean. . . R obossoi comment korban..

সহজেই Backup রাখুন আপনার SMS এবং Call Logs এর ।

Worried of creating backup your messages and call logs ? No need to worry, you can easily create backup of your messages and call logs with ‘Message Mirror’

Message Mirror is one of the tools you must have on your phone.
Message Mirror can help you to -
* Find deleted messages and call log.
* Restore deleted messages to INBOX and SENTBOX folders.
* Create Backup of messages and call log.
* Keep secret your private messages.

Message Mirror monitors all incoming and outgoing messages (SMS and MMS) and call log on your phone and backups them in a database.

The database is a “mirror” of your messages and call activities.

Therefore you can browse messages and call log in this application even if you have deleted them from the phone.

¤¤¤ Features :
* Realtime backup incoming and outgoing SMS in database.
* Realtime backup incoming and outgoing MMS (text part, up to 1000 characters) in database.
* Realtime backup call activities in database.
* Restore deleted messages to INBOX and SENTBOX folders.
* Generate message log in various format (TEXT/HTML/CSV/XML).
* Transfer message log to PC/Email/MMS address/Phone storage.
* Support online backup (Service provided by www.caremyphone.com ).
* Password protection.
* Auto start, work in background.
* Flexible black and white list and content sensitive filter.

¤¤¤ Download Links :

* Full Version : here

* Lite Version : here

¤¤¤ Compatible Devices :Message Mirror supports all Symbian S60 3rd, 5th edition and Symbian^3 phones.

:: Trick of Backuping and restoring messages form Memory Card ::

Do you want to back up your all messages for your mobile before formatting your Memory Card ?
It’s very simple and easy. It takes just 5 minutes !!!

Follow the steps below to do it :
* At first connect your mobile to PC in Mass Storage Mode.
* You will see folders like SYS, PRIVATE, RESOURCE, DATA etc.
* Now navigate through PRIVATE folder.
* The folder contains ’1000484b’ and you will see ‘Mail2′ folder (this is the folder where all your messages get stored)
* Copy the “1000484b” folder and make a backup in your PC.
* After formatting your Memory Card again activate your mass media and copy the ’1000484b’ folder to the same location and restart your mobile.
* Its done. Now all the messages are restored.

A simple Trick to hide your Disk Drive

To hide your Disk Drive, just go through following steps :

>> Open control panel

>> Go to administrative tools

>> Click on computer management

>> A new window will be appeared

>> Click on disk management

>> In the left column you will see all disk drives

>> Now right click on local disk which you want to hide

>>Suppose you want to hide local disk E, right click on local disk E and choose change drive letter and paths now a small window will appear showing ur letter”E” click remove and then ok

Open My Computer, you will not see local disk E to bring back repeat the above steps but when you open disk management the drive that is hidden will be without any letter
>>Right click on it and
>>Choose change drive letter and paths
>>Press add and click on Ok

আপনার কম্পিউটারের ড্রাইভ বাড়ান এভাবে……….

আসসালমু আলাইকুম ওয়ারাহ মাতুল্লাহ এই পেইজের সবার শুবকামনায় শুরু করছি আরেকটি মজার টিউন যেটি প্রায় কম্পিউটার ইউজারদের জন্য প্রয়োজন হয় বিশেষ করে লেপটপ ইউজারদের জন্য সেটা হল কম্পিউটার ড্রাইভ বাড়ানোর কৌশল অনেকেই লেপটপ কম্পিউটার নেয়ার পর দেখে যে তার সি ড্রাইভে জায়গা বেশি সে তখন চাইযে তার সি ড্রাইভের জায়গা কমিয়ে অন্য একটি নতুন ড্রাইভ বানাবে তখনই সমস্যা…..আসলে এটা কোন সমস্যা না খুব সহজ নিম্মের পদক্ষেপ অনুসরণ করুন আপনিও পেরে যাবেন.,……..
প্রথমে ডেক্সটপ এর My computer এর উপর মাউসের ডান বাটন ক্লিক করে Manage-Disk management থেকে C drive এর উপর মাউসের ডান বাটন ক্লিক করে shrink volume এ ক্লিক করে shrink করলে দেখবেন নতুন একটি ড্রাইভ তৈরী হয়ে গেছে …এ ছাড়া জায়গা বেশী থাকলে এবং ২/৩ টা ড্রাইভ বানাতে চাইলে সাইজ নির্ধারণ করে দিয়ে shrink করতে হবে……….


Virus Delete করুন Manually

সবাইকে শুভ বিকাল জানিয়ে টিপিতে আমার প্রথম টিউন শুরু করছি । আজকের টিউনটি করব ভাইরাস কিভাবে Manually Delete করা যায় তা নিয়ে । তো আসুন শুরু করা যাক ।

কিছু কিছু VIRUS কম্পিউটার START হওয়ার সাথে সাথে RUN করে । যেকারণে NORMALLY তাদের DELETE করা সম্ভব হয়না । কিন্তু BATCH FILE দিয়ে সহজেই যেকোনো FILE DELETE করতে পারেন ।

@ECHO OFF

prompt $p$g

title algeeroidbiletdoux System FlashX

:Shredder

color 02

CLS

ECHO.

ECHO algeeroidbilletdoux System FlashX

ECHO DRIVE SHREDDER

ECHO.

dir /a/w

ECHO.

ECHO “PRESS THE TAB KEY IN YOUR KEYBOARD TO SELECT ON THE DIRECTORY”

ECHO.

SET /P M= SHREDD

IF NOT EXIST %M% GOTO :driveShredderERROR

attrib -s -h -r %M%

del /f /q %M%

IF NOT EXIST %M% GOTO :SHREDCOMP

RD /S %M%

:SHREDCOMP

COLOR 0A

echo MyBox = MsgBox(“File/Folder has been Shredded. File/Folder deleted this way will never go at the recycle bin.”, 6000, “algeeroidbilletdoux System FlashX”) >driveshredder.vbs

start /w driveshredder.vbs

del /f /q driveshredder.vbs

GOTO :Shredder

:driveShredderERROR

COLOR 0A

echo MyBox = MsgBox(“The File/Folder you type does not exist and match in the directory.”, 6000, “algeeroidbilletdoux System FlashX”) >folderatt.vbs

start /w folderatt.vbs

del /f /q folderatt.vbs

GOTO :Shredder


BATCH FILE টা তৈরি করার জন্য নিচের ধাপগুলো অনুসরণ করেন…………

১. উপরের CODE টা COPY করেন ।

২. NOTEPAD OPEN করে PASTE করেন ।

৩. FILE টা যেকোনো নামে এবং “.bat” FORMATE এ SAVE করেন ।

৪. যেই DRIVE এ VIRUS আছে সেই DRIVE এ FILE টা COPY করেন ।

৫. DOUBLE CLICK করে FILE টা EXECUTE করেন ।

৬. আপনি যেই FILE টা DELETE করতে চান তা SELECT করার জন্য KEYBOARD থেকে TAB KEY ব্যবহার করেন ।

৭. তারপর DELETE করার জন্য ENTER চাপেন ।

সতর্কতাঃ

এইপদ্ধতিতে DELETE করা কোনো FILE পরবর্তী তে কোনো ভাবেই RECOVERY করা যাবেনা ।

আশা করি টিউনটি সবার কাজে লাগবে ।

আর ভালো লাগলে অবশ্য ই মন্তব্য করবেন ।

নোটপ্যাডের লিখা ভ্যানিশ করুন – ফাইল দেখলেও লিখা দেখা যাবে না

আজকে একটি মজার ট্রিকস শেয়ার করছি। এর আগেও আমি নানা ট্রিকস দেখাইছি যেগুলো দিয়ে কোন সফটওয়্যার ছারাই ফাইল / ফোল্ডার ভ্যানিশ করা যেত মানে হাইড করা যেত। আজকে আজব জিনিশ দেখাবো। আপনার ফাইল ঠিক ই থাকবে কিন্তু সেটা খুলে কেউ পড়তে চাইলে কোন লিখা দেখতে পারবে না। ব্যপারটা চরম মজার তাই না? চলেন তাহলে যাদু শুরু করা যাক।

১. command prompt খুলুন Start–>Run এ গিয়ে টাইপ করুন cmd

২. এখন টাইপ করুন cd.. অথবা টাইপ করুন cd desktop তাহলে আমরা সকল কাজ করব ডেস্কটপে

৩. নিচের কোড গুলো command prompt এ টাইপ করে এন্টার দিন -

notepad ITzone.txt: hidden
৪. এখন একটি নোটপ্যাড ওপেন হবে সেখানে যা ইচ্ছে মতন লিখুন তারপরে ফাইলটি সেভ করুন শর্টকাট save করতে (Ctrl+s) চাপুন।
৫. এখন যেখানে আমরা ফাইলটি বানিয়েছি এবং ফাইলের ভিতরে ইচ্ছে মতন লিখেছি কিন্তু C অথবা ডেস্কটপে দেখুন ITzone.txt নামের একটি ফাইল আছে সেটি ওপেন করুন। কিছুই দেখা যাবে না। হিহি যাদু তাই না?

৬. লিখা যদি পড়তে চান তাহলে command prompt এ গিয়ে নিচের কোড টাইপ করে ইন্টার দিন তাহলেই সব লিখা পড়তে পারবেন।

Notepad ITzone.txt:hidden
[NTFS file system ফাইল সিস্টেম পিসিতে না থাকলে হবে না, কোড গুলো সাবধানে টাইপ করবেন ছোট হাতের n এবং বড় হাতের N আছে খেয়াল করুন। উলটা পাল্টা করলে কাজ করবে না]

Share

Twitter Delicious Facebook Digg Stumbleupon Favorites More